QmlBook gets CI/CD

Christmas is coming and a long and exciting fall is coming to and end. One of my projects during this fall has been to update the QmlBook. This was made possible by The Qt Company who generously stepped in and sponsored my work on this – thank you all!

I’ve worked away during the fall adding a whole bunch of new contents and the documentation people over at The Qt Company has joined in and helped with a language review. One frustrating aspect of the QmlBook project has unfortunately been that the CI/CD system has been broken for a very long time. This means that even the small typo fixes made over the past months has not made it beyond the source git repository.

All this changed tonight! After fighting with Travis, trying to understand why things around Sphinx Docs has broken, realizing that Travis has quirks – as has the old QmlBook deployment setup, I could finally merge pull request #221 – Implementing CI/CD (and then fiddled around with the last quirks). Big thanks to my co-author, Jürgen Bocklage-Ryannel, who reviewed and helped me through this.

To celebrate this, I took the liberty of changing the style of the page. This way, you will recognize that you are browsing the new, updated QmlBook.

There were unfortunately a few sacrifices made during this transition. We lost support for generating QtHelp (it can most likely be fixed) and we dropped support for translations during a transitional period. There is a plan for both translations and different parallel versions of the book. The idea is to tune each version of the book to a specific Qt version.

To sum things up: expect broken links. Expect missing contents. But know that the contents is up-to-date!

Now – go enjoy Christmas! God Jul på er alla!

Video Editing for foss-gbg

Editing videos for foss-gbg and foss-north has turned into something that I do on almost a montly basis. I’ve tried a few workflows, but landed in using kdenlive and, when needed, Audacity. I’m not a very advanced audio person, so if kdenlive would incorporate basic noise reduction and a compressor, I stay within one tool.

Before I describe the actual process, I want to mention something about the hardware involved. There are so many things that you can do when producing this type of contents. However, all the pieces that you add to the puzzle is another point of failure. The motto is KISS – Keep It Simple Stupid. Hence, we use a single video camera with an integrated microphone. This is either an action cam, or a JVC video camera. In most cases this just works. In some cases the person talking has a microphone and then we try to place the camera close to a speaker. It has happened that we’ve recorded someone whispering just by the camera…

As we don’t have a dedicated microphone for the speaker, we get an audio stream that includes the reaction of the audience. That is in my opinion a good thing. It captures the mood of the event. However, we also get quite a lot of background noise which is bad. For this, I rely on this workflow from Rich Bowen. Basically, I extract the audio stream from the recording, massage it in Audacity, and then re-introduce it.

I’ve found it easier to cut the video prior to fixing the audio. This usually means find the start and the end of the talk, but in some cases it is more complex. E.g. removing parts of the Q&A due to reasons, or cutting out a demo that makes no sense when watching the video.

Once in Audacity, I generally pick out a “silent” part of the recoding to learn a noise profile. I then apply a noise reduction effect to the entire recording. This commonly produces a somewhat distorted sound (like if spoken into a can), but the voice of the speaker comes across nicely. After that, I usually apply a compressor effect to balance the loud and quite parts better. I’ve noticed that speakers often start out with a loud voice, and then softens the voice during the talk. For such cases, the compressor helps. It also helps balancing the sound level during Q&A where the audience might be quite or loud compared to the speaker depending on the layout of the venue.

Once the video and audio are cut and filtered, we need some intro and exit screens. I create these using LibreOffice Impress. I have created a template for the title page with the title of the talk and the name of the speaker, followed by a slide with room for the sponsor logo. This has a white background as logos mix badly with the crazy yellow colour of foss-gbg. Finally there is an exit slide which just says foss-gbg.se. I then export the slides to pdf and use ImageMagick to create pngs from them. Since I’m lazy, I just produce huge pngs that I mogrify to the right size. The entire flow looks like this:

libreoffice --headless --convert-to pdf slides.odp 
convert -density 300 -depth 8 -quality 85 slides.pdf slides.png
mogrify -resize 1920x1080 slides*.png

The very last step of the process is to overlap the intro and exit screens with the start and end of the video in a good way. I mix this with fading the audio in and out. The trickiest is fading in, as it is nice to hear the first words of the speaker but you don’t want the noise from the audience. I’ve found that no matter what, you need to fade in the sound, even if the fade only lasts for a fraction of a second. Fading out is easy as things usually ends in an applause.

Then it is all about clicking render, remembering to change the name of the output file and uploading to the foss-gbg YouTube channel.

Working on QML Book

Do you remember QML Book? It started as a project between me and Jürgen Bocklage-Ryannel where we tried to fix the problem that there is no QML book out there.

Back in the Qt 5.2 days, we spent wrote about a year. Unfortunately, the project has mainly been sitting idle since then. I’ve poked at issues every now and then, and Jürgen has done various fixes as well.

Thanks to The Qt Company, this is changing. This autumn, it sponsors me to work on the project. The current plan is to add a chapter to Qt Quick Controls 2, and to update the entire contents to Qt 5.12 and Qt Creator 4.8. By doing so, many of the remaining bug reports will be resolved.

Other things in the backlog are getting the CI system back into shape and having a native speaker edit the language. All in all, this will result in an up-to-date book on QML. If you want to help out, just reach out to me or send me your pull requests. All help is welcome!

QML Weather

I recently took some time to develop a photo frame style home automation control panel. The idea is to control some common tasks of my home assistant setup from a panel instead of having to rely on the phone. To hide the panel, it currently act as a photo frame until touched.

The build is based on a Raspberry Pi 2 with the official touch screen attached and a USB wifi dongle. Nothing fancy, but still good enough.

One of the features that I wanted was a weather forecast, so I decided to use Yr’s xml weather as a base for this. The result is the YrWeatherModel QML item.

The weather forecast overlay.

The presentation side of things is the fairly straight forward piece of QML shown below, resulting in the overlay shown above.

Row {
    anchors.bottom: dateText.bottom
    anchors.right: parent.right
    anchors.rightMargin: 40

    spacing: 20
    Repeater {
        delegate: Column {
            spacing: 2
            Text {
                anchors.horizontalCenter: parent.horizontalCenter
                color: "white"
                font.pixelSize: 16
                font.bold: true
                text: {
                    switch (period) {
                    case 0:
                        "00 - 06"
                        break;
                    case 1:
                        "06 - 12"
                        break;
                    case 2:
                        "12 - 18"
                        break;
                    case 3:
                    default:
                        "18 - 00"
                        break;
                    }
                }
            }
            Image {
                anchors.horizontalCenter: parent.horizontalCenter
                source: symbolSource
            }
            Text {
                anchors.horizontalCenter: parent.horizontalCenter
                color: "white"
                font.pixelSize: 16
                font.bold: true
                text: precipitation + "mm"
            }
            Text {
                anchors.horizontalCenter: parent.horizontalCenter
                color: "white"
                font.pixelSize: 16
                font.bold: true
                text: temperature + "°C"
            }
        }

        model: weatherModel.model
    }
}

This is followed by the model itself, and a small notice of the data source.

YrWeatherModel {
    id: weatherModel
    place: "Sweden/V%C3%A4stra_G%C3%B6taland/Alings%C3%A5s"
}

Text {
    anchors.bottom: parent.bottom
    anchors.right: parent.right
    anchors.bottomMargin: 5
    anchors.rightMargin: 40
    text: weatherModel.dataSourceNotice
    color: "white"
    font.pixelSize: 16
    font.italic: true
}

Diving into the model itself, we hit the interesting parts. The structure looks like this:

Item {
    id: root

    property alias model: weatherModel
    property int refreshHour: 1     // How often is the model refreshed (in hours)
    property int dataPoints: 6      // How many data points (max) are expected (in 6h periods)
    property string place           // Place, URL encoded and according to Yr web site, e.g. Sweden/V%C3%A4stra_G%C3%B6taland/Alings%C3%A5s
    readonly property string dataSourceNotice: "Data from MET Norway"

    ListModel {
        id: weatherModel
    }

    Timer {
        interval: 3600000 * root.refreshHour
        running: true
        repeat: true
        onTriggered: {
            _innerModel.reload();
        }
    }

    XmlListModel {
        id: _innerModel

        query: "/weatherdata/forecast/tabular/time"

        source: (place.length === 0)?"":("https://www.yr.no/place/" + root.place + "/forecast.xml")

        XmlRole { name: "period"; query: "string(@period)" }
        XmlRole { name: "symbol"; query: "symbol/string(@number)"; }
        XmlRole { name: "temperature"; query: "temperature/string(@value)"; }
        XmlRole { name: "precipitation"; query: "precipitation/string(@value)"; }

        onStatusChanged: {
            // ...
        }
    }
}

As you can see, the model consists of an inner model of the type XmlListModel. This model is refreshed by a timer (don’t refresh too often – you will most likely be auto-banned by Yr). At the top, there is also a ListModel that is the actual model used by the user interface.

The reason for the ListModel to exist is that I wanted to be able to limit how many data points I show. Each data point represents a six hour window, and I’d like 6 of them, i.e. one and a half day of forecasting.

The onStatusChanged handler in the XmlListModel takes care of this in the following for loop:

onStatusChanged: {
    if (status === XmlListModel.Ready)
    {
        for(var i = 0; i< root.dataPoints && i < count; ++i)
        {
            var symbol = get(i).symbol;
            var period = parseInt(get(i).period);
            var is_night = 0;

            if (period === 3 || period === 0)
                is_night = 1;

            weatherModel.set(i, {
               "period":period,
               "symbol":symbol,
               "symbolSource":"https://api.met.no/weatherapi/weathericon/1.1/?symbol=" + symbol + "&is_night=" + is_night + "&content_type=image/png",
                "temperature":get(i).temperature,
                "precipitation":get(i).precipitation
                });
        }
    }
    else if (status === XmlListModel.Error)
    {
        console.warn("Weather error")
        console.warn(errorString());
    }
}

As you can tell, this code has *very* limited error handling. It is almost as it has been designed to break, but it works. The code also shows how convenient it is to connect to online services via QML to build simple, reusable, models that can be turned into beautiful user interfaces.

Next time I have some free time, I’ll look at interfacing with the public transport APIs. Then I will have to deal with JSON data and make explicit XmlHttpRequest calls.

Complicating Licensing

I’ve recently seen a couple of attempts to present non-open source licensing as almost open source. What I’m talking about is Commons Clause and fair source. This sounds a lot like the failed shared source model promoted by companies such as Microsoft in the early 2000. Yes, I’m looking at you redis and neo4j.

What I find particularly disturbing is the way that both, but especially Commons Clause, attempts to piggyback on the good name of open source. The naming is very close to Creative Commons, and the way that the clause is intended to be introduced is very confusing for the user as the user would see a familiar open source license, and then just a “small” exception.

I would argue that the way to go about this is to combine a strong copyleft license such as GPLv3, LGPLv3 or AGPLv3, with a CLA. That way a dual licensing model could be used to create a business model. If that is not possible, the [A/L]GPLv3 needs to be improved – not complicated by additional clauses added by a third party.

The consequence that anyone accepting the strong copyleft can do whatever they like with the software is not a bug in the copyleft license, but instead a feature. Actually, this is one of the core four freedoms of free software.

At the end of the day, my cynical self gets the impression that this is something that you add to an existing project once it has gained traction and then hope that it does not render in fork. If something like the Commons Clause would have been present from the start, the projects would never had gained the user bases and communities that they are enjoying today.

Work v2.0

Returning to work this autumn has a slightly different feel to it as I’m working on getting a new business up and running. This is both rewarding and stressful at once. Strangely enough, it actually felt good to get up early to get to work.

The major hurdle during the bootstrapping phase is how to handle free time. I do have more free time at the moment, as I’m only working part-time for my current customer. However, I also have an infinite backlog of things to do. This is everything from basic administration, doing sales to pet projects.

I guess what it comes down to is to handle and prioritize infinity. For now, I have gbgcpp, foss-gbg and Kuro Studio to fill my time. It will be fun!

I made a thing

Sweden is currently going through one of the worst droughts in recorded history. One of the consequences of the high temperatures is that my vegetables needs constant watering. Of course this is a task that I want to automate.

I already run home assistant for some basic automation at home (mostly lights). Now, I got a pump for caravans from a cheap store, found a 12V power supply in a drawer and hooked it all together. I attached a hose and dropped the pump into my rain water barrel (which is very empty at the moment).

Having spent quite some time making holes in the rest of the hose, I now think that I have a reliable watering system. The challenge seems to be to make reliable holes in the hose. I started with a knife, ended up with a power drill and a 6mm drill bit.

For the control, I use one rule to turn the water off after 2 minutes each time, then I just have time based watering sessions at 20.00, 20.30, 21.00 and 21.30. This should hopefully be enough.

I’ll monitor how much water this uses for a few days and look for dry spots along the hose. Hopefully this is another part of the gardening automated (the lawn mowing has already been solved with a robot).

D-Link and the GPL

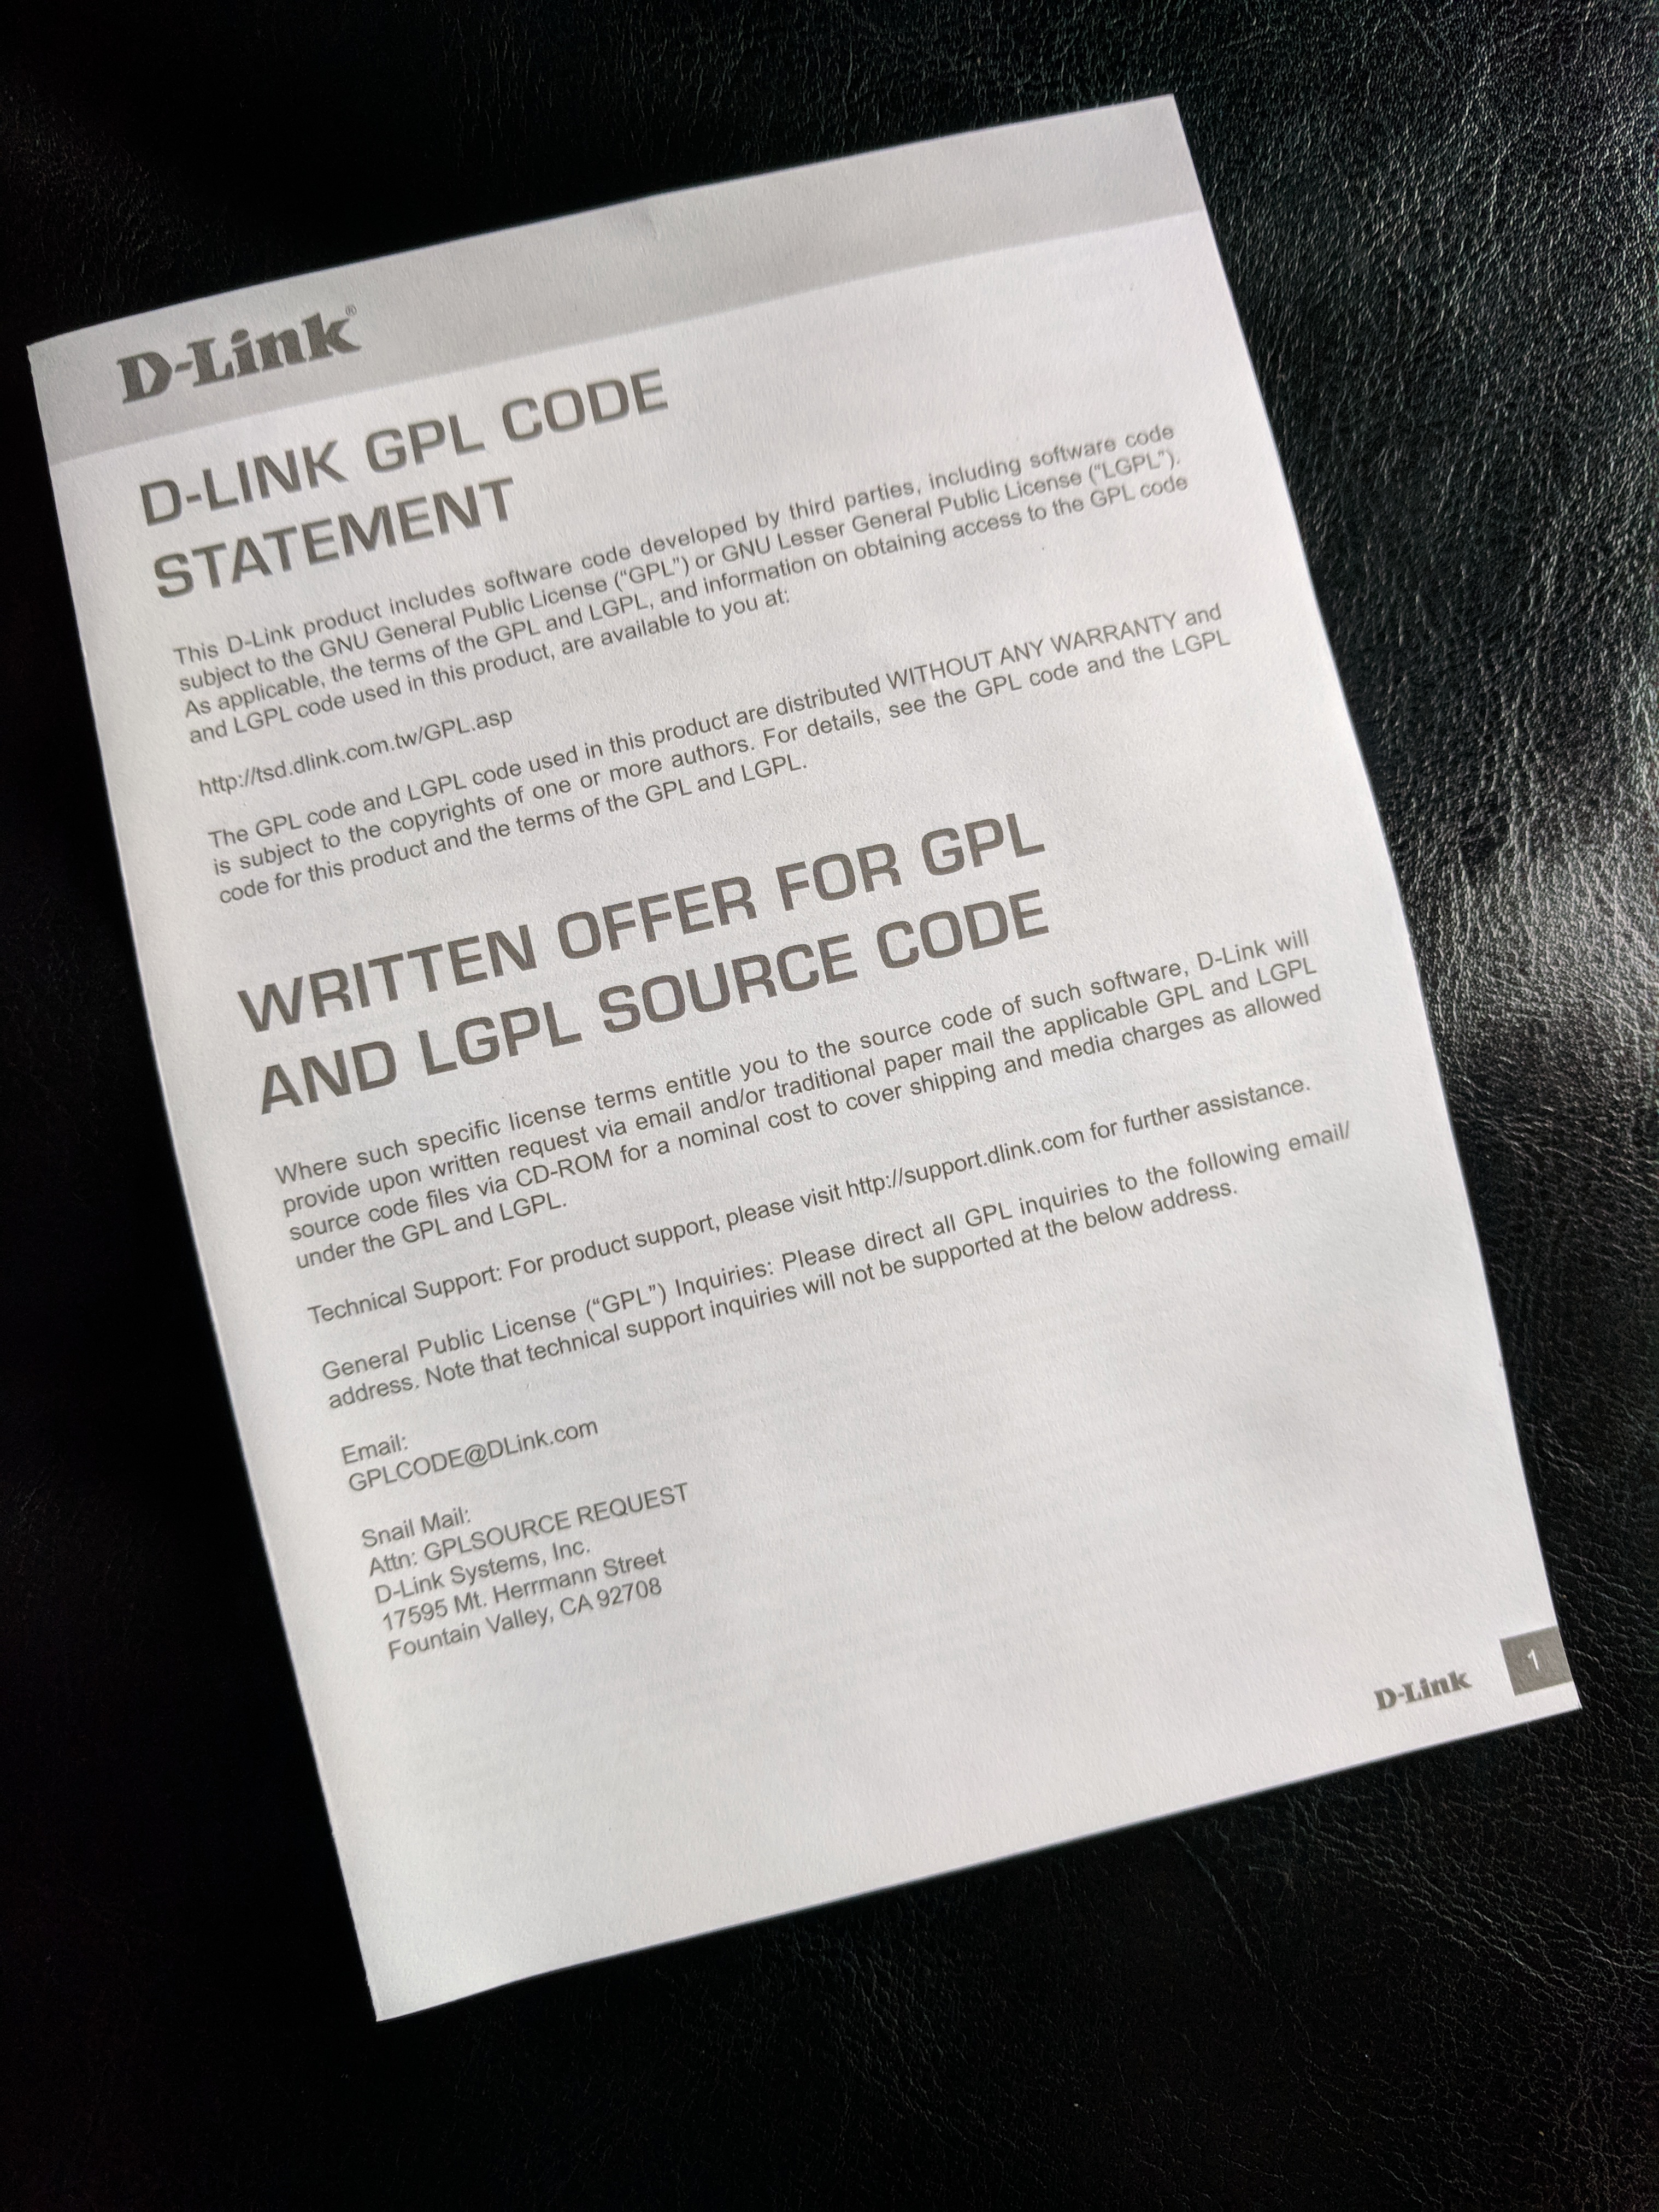
Recently my router died and to get netflix flowing again, I went out and got the cheapest router I could find in the vicinity. I ended up with a D-Link DIR-842 on discount for 499 SEK. In the box, I discovered this:

It tells me to go to D-Link’s page for GPL licensed software to get the source code. It also lets me write a request the source code on physical media for a nominal fee for the media and handling. Something I naturally did (being an engineer on vacation).

While waiting for a reply, let’s have a look at the online version. When entering the URL provided you have to click through an agreement that I understand what GPL and LGPL means and that the files distributed comes with no warranties (they spend more words saying this – read it if you want the details). Clicking “I Agree” I get a popup (back to the 90’s) asking me to register my product to enjoy all the benefits of doing so. At the same time the main window continues to a list of all D-Link products containing (L)GPL software – very nice.

The list of products is 24 pages long, so I searched for my model name (DIR-842) and clicked the resulting link. This got me to the following table:

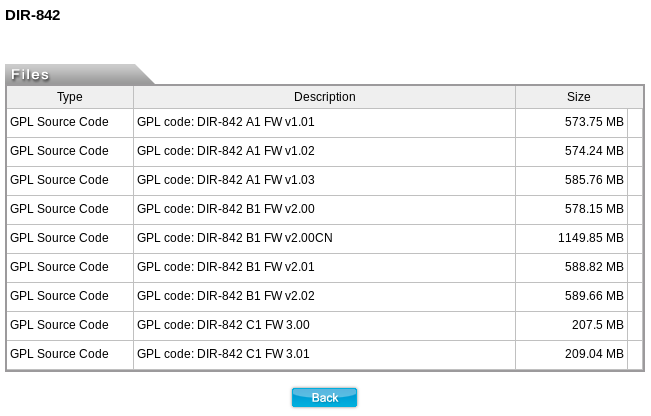
I wonder what separates firmware version 2.0CN (China?) from version 3.0. Having 950MB of translation tables seems odd, so something else must be the case. As I have firmware version 2.02 for hardware revision B1 I decided to download that bundle consisting of 590 MB of open source code as a tarball. At least, that was what I expected. Apparently, I don’t only get the sources, I also get a test report – great!

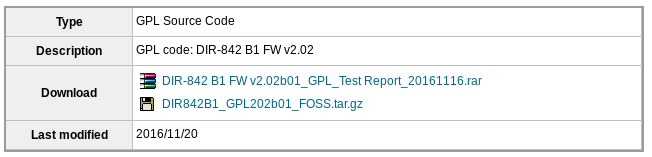
The test report rar file contained a pdf documenting the tests. On November 16, 2016, test engineer Mason Wu carried out the GPL SC tests consisting of the steps Firmware upgrade, Firmware downgrade, Compile the Open Source Software Licenses code, Check list (Before test Open Source Software Licenses), Open Source Software Digital Signature check, and License file check. All tests passed – time for celebrations!

To be completely honest, this report tells me nothing, as I don’t know what has been tested or what the test cases do. The only thing I learn is that I just put a device with almost two years old software on as my interface towards the Internet…

So what is in the source code tarball? You can see the directory structure of the tarball in the picture below (I guess someone named Lisa created the tarball). First of all, there are some licenses, then the source code.

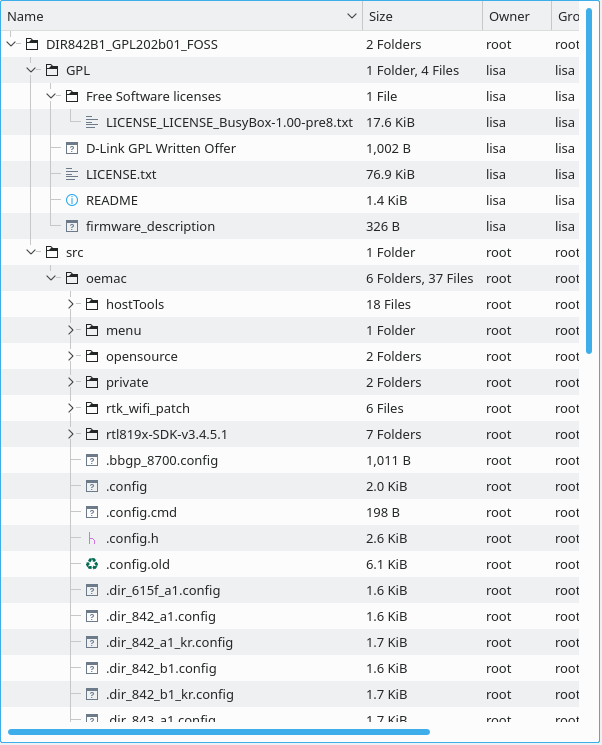
The source code is split into open source and private, where private is a set of prebuilt binaries, while open source comes with the whole source code. The open source software is licensed under the following licenses according to the LICENSE.txt:

  • GNU General Public License Version 2 (GPLv2.0)
  • GNU Lesser General Public License Version 2.1 (LGPLv2.1)
  • BSD 2-clause license
  • BSD 3-clause license
  • Apache License 2.0
  • zlib/libpng License
  • MIT License v2.0

Looking into the realtek SDK (rtl819x-SDK-v3.4.5.1) I found the base Linux system (under rtl819x-SDK-v3.4.5.1/rtl819x). This is open source software found outside the open source directory.

There does not seem to be a license for the proprietary stuff. Not for the realtek related directories (rtk_wifi_patch and rtl819x-SDK-v3.4.5.1), nor the directory named private. I’m not sure what that means from a licensing perspective. I guess it is complicated. The nice thing with this is that I should be able to rebuild a new firmware image from this.

Continuing down the rabbit hole I’m getting really worried. Remember that this is an internet facing device. There are so many things I want to point out, but I’m on vacation so I can’t dig through the whole source code. Here are some snippets:

  • The Makefiles outputs “It’s builded” when done. Kind of cute.
  • Building is supported on CentOS 5.9 (32-bit version) with GCC 4.1.2 20080704 (Red Hat 4.1.2-54). This is a release from 17 January 2013.
  • Building has to be done as root.
  • For the proprietary stuff, there are .c.dep files showing what source files where used and their dependencies. Also, some headers are included without copyright information.
  • The open source versions are really old. Some highlights:
    • Samba 3.0.24 – from 2003. The CVE list for Samba is scary – this is a piece of software that should be updated.
    • Kernel 2.6.30 – from 9 June 2009. End-of-lifed in October 2009).

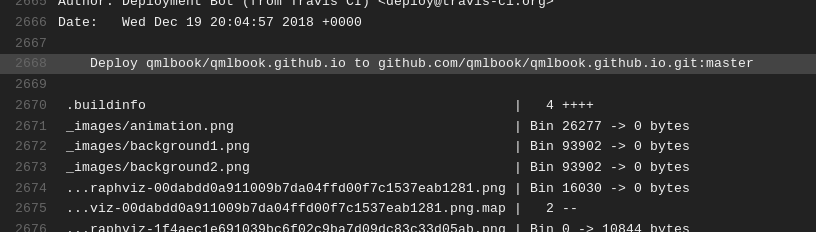
However, the most critical issue is that code is not included in the release. Looking at the directory rtl819x-SDK-v3.4.5.1/rtl819x/toolchain there are a number of GCC tools (GPLv3 licensed, so the license list is incomplete) as well as binutils delivered only as binaries. These also include realtek confidental documents (see screenshot below).

I’m stopping my dig here, but I will have to follow up my written request for the source code, unless the optical medium contains more. I thought they had learned

Tooting

As web 3.0 is the next big thing – and I really like the idea – I decided to give mastodon as spin (second time around). Feel free to follow me – I’m @e8johan@mastodon.technology.

As I’m just getting started, I’m exploring this whole space a bit. I picked the instance to join (mastodon.technology) based on the fact that KDE lives there. As mastodon is federated, I can still interact with users of other instances.

Then I used the bridge app to find my twitter friends. This only works if both are using the bridge app, so I encourage everyone to try it.

Finally, I picked Mastalab as my phone app, but I’ve just used it for two minutes, so I cannot tell you if it is good or bad. What I do know is that it is open source and easily installable from the Play Store as well as F-droid

What are you using for mastodon and who should I follow? Let’s get tooting together!

New adventures – old challenges

Times pass and we all change. I’ve realized that I’ve gone from mostly coding at work, to almost not coding at all (I reflect on this in the Under utveckling pod – Swedish only). I’ve also realized that what I do in automotive has a much wider application (see my fosdem talk on this). Thus, the conclusion is that the time has come to change context.

I’ve also spent a lot of time on promoting free and open source software. I’ve spoken at conferences, gone to hackathlons, spoken at the university, and arranged meetups. All this culminated in foss-north which I’ve been organizing for the past three years.

The conclusion from all of this is that there is an opportunity to focus on this full time. How can free and open source software be leveraged in various industries? How does one actually work with this? How does licensing work? and so on. To do so, I founded my own company – koderize – a while back and from now on I’m focusing fully on it.

Before joining Pelagicore back in 2010 I was solo consulting for a year. This was a great opportunity and I finally got to spend some time working directly with the former Trolls at what later became The Qt Company. However, I also came to realize that solo consulting makes me go slightly mad. Also, my wife complained that I talked to much every afternoon when she came home ;-)

Thus, I want colleagues. That is why myself and some great people that I’ve passed by during my years in this field are founding Kuro Studio (the web page is minimalist – i.e. empty).

The team we’re setting up complement each other and the sum of our experience covers the full full-stack. We can do team building, purchasing, processes, QA, agile, development, design, licensing, devops – even some hardware. The goal is to create an end-to-end product design team that can help out during any phase of product development, as well as organizational development.

At the end of the day I’m still passionate about what I have been doing the past 8 years. Cars excite me, and combining that with Qt and Linux makes me even more excited. That means that I’ll still be around in that field. As a matter of fact, my first assignment is in that area.

So, at the end of the day, time pass, we grow, but some things still stay the same. A big thank you to everyone at Pelagicore – it was a great ride.